click click click

Showing posts with label Recipes. Show all posts

Thursday, March 21, 2013

The Chilled & No-Cook Oatmeal

I've always cooked my oatmeal. I'm used to heating it up on the stove and I have to say that doing so sometimes discourages me from having oatmeal even though I like having it for breakfast (We don't own a microwave at home so that premise is moot).

Thank goodness the universe heard me and one day, I read a tweet from one of my tweethearts Bettina (@blissfulcow) wherein she shared that it's possible to eat chilled oatmeal. Hooray! Problem solved! 

So here's what I do in creating chilled and no-cook oatmeal in jars:
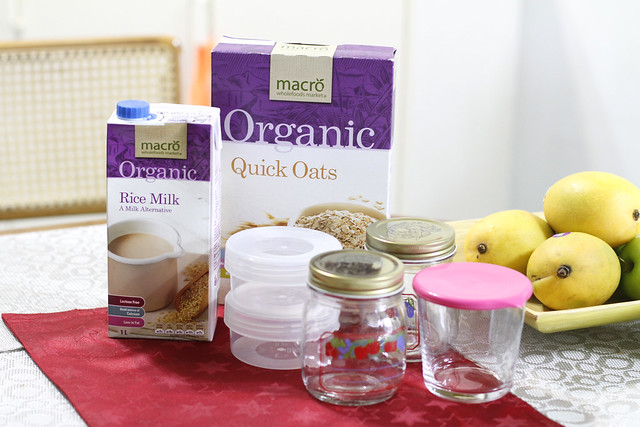
You need:
2 cups of Oatmeal
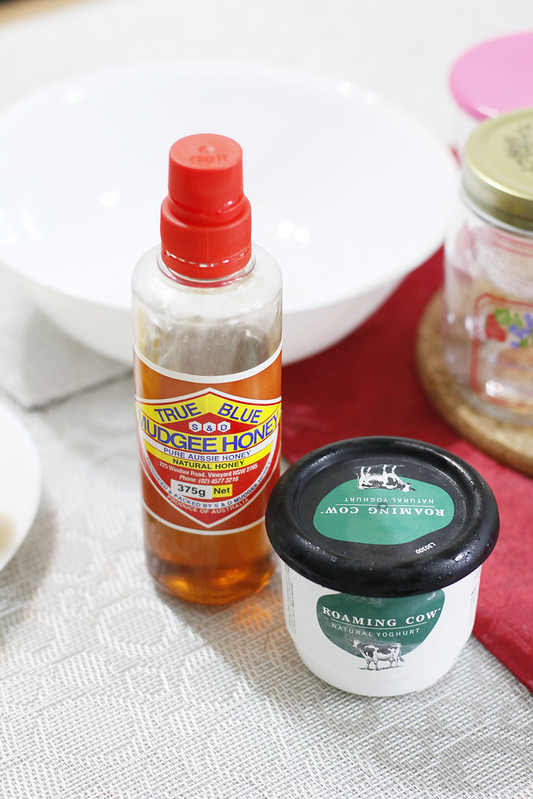
180 grams Natural Yogurt
2 cups of Milk
3 tbsp Honey
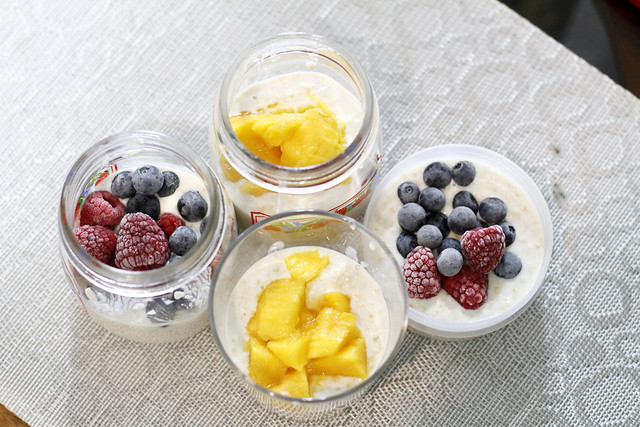
Fruits (or nuts) to mix in with your oatmeal (to make it a healthier dish)

- this yields 4 jars.
The Chilled & No-Cook Oatmeal
I always opt for the Natural Yogurt as it's less sour. Alternatives to Honey: Maple Syrup, Sugar, Nutella, Peanut Butter. 
The Chilled & No-Cook Oatmeal
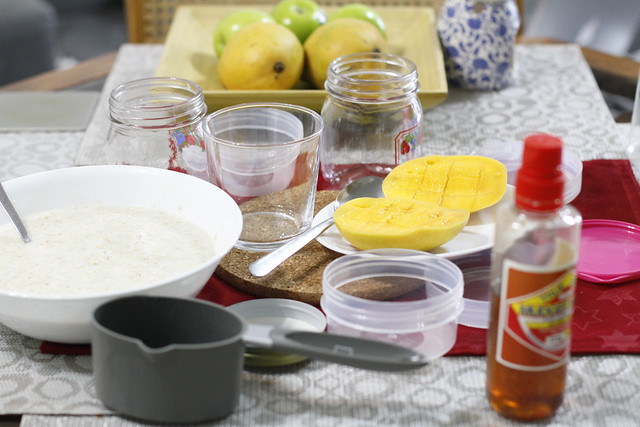
Mix the oatmeal, yogurt, honey and milk in a bowl.
The Chilled & No-Cook Oatmeal
Then place the mixture inside jars or plastic containers. Throw in your fruits on top and seal the jar/container. You can also add nuts if you like.
The Chilled & No-Cook Oatmeal
Put the jars inside the fridge and chill them for at least 30 minutes. That's enough time to soften the oatmeal.

Freeze and Eat
I make a big batch, enough to fill at least four jars, during weekends and store them inside the freezer. I usually bring a jar to work and eat it for breakfast or morning tea. I finish all four jars in the course of the workweek. 

I've read that frozen oatmeal can stay good until about a month. The longest time I've stored oatmeal inside the freezer was two weeks.

The Flexibility of Oatmeal
There are so many things you can add into your oatmeal other than fruits and nuts. You can also make substitutions for the milk (almond milk, soy milk etc) and flavour of your yogurt. You can also omit the yogurt from the recipe if you don't like yogurt. You can add different toppings, syrups and seeds (i.e. chia seeds).

Why I Love It
It keeps me full for longer. It's low in calories but high in fiber, removes bad cholesterol, contains antioxidants and enhances the immune system. It's easy to make and and it tastes good! 

Wednesday, December 12, 2012

Recipe: Real Corned Beef

For me, the best and healthy corned beef is the one made at home. I learned how to cook real corned beef from one of my aunts a few years back. This recipe is easy and simple. All you need is to buy Silverside Beef, a cut of beef from the hindquarter of a cattle just above the leg cut, from the butcher or you can find packed silverside beef in the supermarkets. The packed silverside beef from the supermarkets usually comes with instructions on how to cooke corned beef.

Recipe: Corned Beef
Recipe: Corned Beef
What you need to prepare:
Silverside Beef
1 tbsp Sugar
1 Onion, peeled and sliced
2 Bay Leaves
1/2 cup Vinegar
Cold water to cover the meat
Salt and Pepper to taste

For the gravy: I buy Gravox. 2 tbsps of Gravox, mix it with beef stock from the saucepan (where you boiled your silverside) and a bit of butter. 

What you need to do:
1. Place meat in a deep sauce pan.
2. Add all the ingredients in.
3. Stir and then cover the sauce pan.
4. Slowly bring liquid to boil and reduce heat until liquid is just simmering.
5. Simmer, while covered, until meat is well done. Allow approximately 40 minutes per 500grams.
6. Once cooked turn off heat and keep meat in it liquid (to avoid dryness) until ready to slice. 
7. Serve with gravy or other preferred condiments.
Recipe: Corned Beef
You can easily pair this up with rice, vegetables or salad. This would also make a wonderful and healthy sandwich.

Tuesday, December 11, 2012

Recipe: Kimchi Rice

I started cooking Kimchi Rice a few months ago and thought not to share the recipe because it can easily be searched in Google anyway. However, I've been getting requests to share how I do it. So last night I looked for my first Kimchi Rice photo and decided to write down my Kimchi Rice Recipe.
Recipe: Kimchi Rice
What you need to prepare:
1 tbsp Sesame Oil
1 medium-sized Onion, chopped
1 tsp Garlic, chopped
1 tsp Ginger, chopped
3 tbsp of Kimchi 
1 tbsp soy sauce
1 cup of Cooked Rice
1/4 cup of Shallots, chopped
Salt and pepper to taste 
1 fried Egg

Tip: You can lessen or add rice and kimchi, depending on your appetite or whether you are serving a number of people.

Optional: You can add meats like bacon, beef or chicken to this dish.

What you to do:
1. Fry egg in sesame oil and then set aside.
2. Using the same oil, saute onion, garlic and ginger.
3. Add kimchi and stir for a few minutes until transparent.
4. Pour soy sauce.
5. Mix in rice until well-combined with kimchi. Throw in a dash of salt and pepper.
6. Stir for about 4-6 minutes and then add the shallots.
7. Serve with fried egg on top.

Below is a photo of the Kimchi Rice I had for dinner last night, shared on instagram.
Enjoy and happy cooking!

Thursday, September 13, 2012

Recipe: Japanese Tinola

The Husband has grown tired of eating Tinola. That's kind of sad because I love Tinola. I still cook it once in a while because I can't help but crave for it, however, I had to think of way for the Husband to love Tinola again.

So yesterday, I went to the newly-opened Daiso in Chinatown (will blog about it soon, promise!) and picked up a few Japanese ingredients that will help me combine my Husband's love for Miso Soup and my love for Tinola. My first experiment at cuisine fusion, I call this my Japanese Tinola recipe.
_MRecipe: Japanese Chicken Tinola G_5764
From Daiso: Starch Noodles (left) and Bonito Soup Stock (right)
From an Asian Supermarket: Shiro Miso (top right)

What you need to prepare:
1 tbsp Canola Oil (or any cooking oil of your choice)
1 tbsp Ginger, chopped
1 medium-sized Onion, chopped
3 cloves of Garlic, chopped
1/2 kilo Chicken Wings
2 tbsp Fish Sauce
1 pack of Bonito soup stock, dissolved in four cups of water
1 tbsp Shiro Miso
2 pcs Sayote (Chayote/Choko), peeled and sliced 
Starch Noodles (no measurement, I only grabbed a handful, enough for the soup I made, add more if you want your soup more "noodly")
Salt and Pepper, to taste
Additional water if you want your dish to have more sou

What you need to do:

  1. Saute onion, garlic and ginger in oil.
  2. Add the chicken and fish sauce. 
  3. Stir then leave for a few minutes to let the chicken's natural juice to come out.
  4. Add the Bonito soup stock and Shiro Miso, stir again until liquid is free of lumps.
  5. Cover the pot, bring to boil then let it simmer in medium heat until chicken is cooked (25-30 minutes).
  6. Sprinkle with salt and pepper to taste.
  7. Add the sliced Sayote and leave for another 10 minutes. 

Tips: 
  • Serve in a bowl with fish sauce, soy sauce with lemon/calamansi or chili with lemon and soy sauce. 
  • Perfect companion to steam rice.
  • You can add/change vegetable ingredients to Green Papaya (Pawpaw) or Malunggay leaves. I sometimes use Chinese Cabbage too. 
Serves 3 people.

Recipe: Japanese Chicken Tinola
This fusion experiment proved to be successful. The Husband loved it, he cheerfully ate his Tinola and even went for a second serving. I'm glad I was able to to create a version of Tinola where you can harmoniously taste the combined flavours of ginger, miso and bonito. Suddenly, I have my own version of Tinola that's a little more exciting that usual.

Thursday, August 30, 2012

Recipe: Baechu Doenjang Guk (Cabbage in Soybean Stew)

Here's another Korean dish I learned to prepare this week. 


Recipe: Baechu Doenjang Guk (Cabbage in Soybean Stew)
 
What you need to prepare:
2 tbsp Canola Oil (or whatever cooking oil you use at home)
3 cloves Garlic, minced
200 grams Beef Strips
4 cups Beef Broth
4 tbsp Soybean Paste (Doenjang/Korean Soybean Paste)
1 head Napa Cabbage, chopped
100 grams Mushrooms, sliced 
Black Pepper (to taste)
2 spring onions, chopped 

Optional:
Chili Flakes/Green Pepper/Red Pepper: to make the dish spicy
Zucchini (sliced): for added nutrition, flavour and colour
A few drops of Sesame Oil: makes it more tasty and fragrant

What you need to do:
Long way:
1. Saute garlic in oil. 
2. Add the beef strips and stir for 5-7 minutes.
3. When beef strips turn light brown, add the beef broth.
4. Add soybean paste and dissolve it with the broth.
5. Let it simmer for 10 minutes.
6. Throw in the cabbage and mushrooms. Cook for another 10-15 minutes.
7. Add pepper to taste.
8. Turn off the stove, serve in a bowl and add the spring onions on top.

Short way:
1. Bring beef broth to boil. 
2. Once broth is very hot, add soybean paste. Stir until paste is dissolved.
3. Add beef strips and leave for 10-15 minutes. 
4. Throw in the cabbage and mushrooms. Cook for another 10-15 minutes.
5. Add pepper to taste.
6. Turn off the stove, serve in a bowl and add the spring onions on top.
Recipe: Baechu Doenjang Guk (Cabbage in Soybean Stew)
 
Tips:

  1. You can change your beef ingredient to tofu, chicken or pork.
  2. Other options for broth is Anchovy Broth or Vegetable Broth.
  3. The beef strips should be thinly sliced so it will cook easily and will be tender. You can ask the butcher to slice them for you or buy packed beef strips from Asian supermarkets.
  4. If you don’t have any mushrooms or spring onions at hand, that is fine.

This dish is good for 4-6 people. 

For other Korean dishes I've cooked, click below for the recipes:

Tuesday, March 13, 2012

Recipe: Beef Bulgogi


While it is easy to find Bulgogi marinades in supermarkets these days, I learned how to make my own Bulgogi marinade last year.  The bottled marinades may be flavourful but in reality, homemade Bulgogi doesn't need to have a strong BBQ-y taste.  Instead, it should have a harmony of balanced flavours that doesn't overwhelm.

For the recipe below, you will need half a kilo of Beef.  Tenderloin, Sirloin or Rib-Eye would be good options.

What You Need for the Marinade Sauce:
4 tbsp of soy sauce
4 tbsp of water 
3 tbsp of sugar 
2 tbsp of honey
2 tbsp of sesame oil
1 tsp pepper
4 cloves of garlic, minced


What You Need to Finish Off the Dish:
1 tbsp toasted sesame seeds
2 stalks of green onion/shallots, chopped (alternative: white onions)
Salt and Pepper, to add flavour


Optional: 
Mushrooms, sliced
Carrots, sliced


What To Do:

  1. Slice half a kilo of beef into thin strips.
  2. In a bowl, throw in the ingredients of your Marinade Sauce, then mix it with the sliced beef until well coated.
  3. Marinate for at least 2 hours and keep it in the refrigerator. I leave it overnight for maximum flavour. 

You can cook your Bulgogi-marinated beef in two ways:
(1) Grill the beef.  After grilling, transfer to a plate or cast iron plate.  Sprinkle it with shallots and sesame seeds. (see my previous post: Weekend BBQ Party with Friends)


(2) Stir-fry the beef in sesame oil, garlic and onion.  Saute for a while then throw in mushrooms, carrots and green onions.  Add salt and pepper if needed. Once the beef and vegetables are cooked, transfer to a plate or bowl and sprinkle with sesame seeds (see photo below).

Recipe: Bulgogi

Note: Measurements of ingredients are based on estimates so these only serve as guides.  If you want stronger flavours, you may choose to add more. The key is to taste as you go along.

Happy cooking!

Thursday, July 28, 2011

Recipe: Kimchi Stew

Other than eating Kimchi as a condiment, there are many ways on how to cook Kimchi into becoming something else.

If you have Kimchi that you'd like to use, you can make it into Kimchi Stew.  I like this dish because it's very easy to cook and perfect for winter season.

What you need:

1/2 kilo Pork Belly
4 cups of chopped Kimchi (you can add more if you want)
1 tbsp sugar
1 tsp hot pepper flakes
1 tbp hot pepper paste
1 medium-sized onion, chopped
4-6 stalks of green onion, chopped
Tofu
Radish (cut into strips)
Sesame Oil
Water

Kimchi Stew Recipe
Kimchi Stew Recipe


What you need to do:

1.  In a pot or earthen bowl, put your chopped Kimchi and some Kimchi Juice.
2.  Add in the pork belly, chopped onions., green onions, hot pepper paste and hot pepper flakes.  You can make the stew more spicy if you add more hot pepper paste and hot pepper flakes.
3.  Pour water until all ingredients are submerged.
4.  Close the lid of the pot and simmer for 20-25 minutes.  The first 10 minutes should be in high heat, then turn down to medium heat.
5.  Add the tofu and radish and let it sit for 10 minutes.
6.  Pour a few drops of Sesame Oil before serving.
Kimchi Stew Recipe

This Kimchi Stew recipe is inspired by Maangchi's recipe.
Follow ibyang on Twitter

Saturday, July 9, 2011

Recipe: Easy-to-Prepare Kimchi

I've been learning how to cook Korean cuisine for the past weeks because other than wanting to learn cooking different cuisines, my Husband and I really enjoy eating Korean food.  Last weekend, I was able to cook three Korean dishes.  I felt very good being able to practice what I've read about Korean cuisine and very happy because my Husband loved them. 

While there are Asian grocery stores in our area and they usually sell Korean marinades and packed Kimchi, I love that I'm able to make my own Korean marinades and Kimchi.  And as much as possible, I avoid buying bottled marinades because they are sometimes high in salt, sugar or preservatives.

There are different ways of making Kimchi.  I got the inspiration of this recipe from a Korean Blogger named Maangchi where she shared a few Kimchi recipes in her site.

The traditional Kimchi is made with Napa Cabbage, but this recipe uses the common cabbage we see in the markets.  One of the things I learned when we visited the Kimchi Museum in Seoul, Korea was that any vegetable is a probable candidate to be "kimchi-ed". 

I chose this recipe of Maangchi because this is the easiest and less complicated.  I made a few changes on the measurements of the ingredients because I based it on my family's taste and tolerance for spice.  I suggest that if you make your own Kimchi at home, season as you mix so the taste will also be based on your preference.  You can just use my measurements as a guide.  The Kimchi I made was just medium spicy; not too hot. 

What you need:
1/2 head of medium sized Cabbage (cut into strips)
1/4 cup Hot Pepper Flake
3-5 tbsps Fish Sauce (depends on your taste)
1 tbsp Sugar
1/4 cup minced Garlic
4 stalks Green Onion (cut into strips)
1 medium-sized julienned Carrot
1 cup cold water
1/4 cup Salt

What you need to do:
1.  Cut your cabbage into strips and place into a large bowl. 
2.  Add 1 cup of cold water and 1/4 cup salt.  With use of your hands, mix it well to properly salt the cabbage.
3.  Set aside for 10 minutes.

Easy-to-Prepare Kimchi

4.  Make the Kimchi Paste by mixing the following ingredients:
1/4 cup hot pepper flakes (you can lessen or add depending on how spicy you want it to be)
1 tbsp sugar

3-5 tbsps Fish Sauce (saltiness should be based on your taste)
1/4 cup minced Garlic
4 stalks Green Onion (cut into strips)
1 medium-sized julienned Carrot

Easy-to-Prepare Kimchi


5.  Wash and rinse the salted cabbage in cold water for about 2-3 times then drain.
6.  Mix the Kimchi Paste into the cabbage thoroughly.  Better to use your hands in mixing.

Easy-to-Prepare Kimchi


7.  Put the Kimchi into a container or jar.
8.  Press the top of the Kimchi down with your hands to protect your Kimchi from being exposed to too much air.  Seal container tightly.

Easy-to-Prepare Kimchi


You can eat this Kimchi right away and call it fresh Kimchi.  If you want to ferment the Kimchi, keep it at room temperature for a few days.  I fermented my Kimchi for 3 days and then stored it inside the refrigerator.

If after a few days of fermentation and you find white stuff (mold) on top of the Kimchi, remove the top layer and the rest of Kimchi will still be good for the months and months.
My 1st Kimchi

Jal Meokkesseumnida!!!! (Bon appetit! in Korean)


Follow ibyang on Twitter

Saturday, February 12, 2011

Recipe: Spicy Adobong Pusit

This is our dinner tonight! :) 


Adobong Pusit

What you need:

1/2 kilo Squids
1/2 tsp Salt
1 Bay leaf
1/4 tsp Pepper
4 cloves Garlic, mashed
1/3 cup Vinegar
1 tbsp Sugar
1/4 cup Water
3 tbsp Canola Oil
1 Onion, diced
Red Chilies or a dash of Chili flakes/powder (optional)

What you need to do:

1.  Clean the squids by pulling out head, tentacles, innards and transparent ribs from body of squids.  Discard innards and transparent ribs.  Wash bodies and tentacles.  

2.  Marinate squids in salt, pepper, garlic, vinegar, water, sugar and bay leaf.  Leave for an hour.  After an hour, drain and set aside the marinade.

3.  Saute onion in hot oil.  Add drained squids and mix for about 10-12 minutes (or until juices evaporate).  Strain your marinade then add to sauteed squids.  Simmer for another 10 minutes.  If you want your Adobong Pusit spicy, add chopped red chilies or a dash of chili flakes/powder.

Serve Adobong Pusit with steamed rice.

What's your dinner tonight???

Monday, January 3, 2011

Welcome 2011!

While I almost didn't prepare anything for our Christmas Noche Buena, I was very much prepared for the New Year Media Noche.  Celebrating New Year is more of a big deal for me because I love beginnings, I love starting anew. 

Our table spread on New Year's eve consisted mostly of fruits, a noodle dish, leche flan (for dessert), champagne to toast to the new year and my main, Baked Ham.
Welcome 2011!


It has been my dream to bake my own ham so I decided last year that I will try my best to make one for the new year.  Thank God I found half of a leg ham in the supermarket a week before Christmas.  It's so hard to find a small whole leg ham here (everything is so big!) so our best option was to get a half leg.
Welcome 2011!

I started preparing the ham on the 30th December.  Boiled the ham in pineapple juice, beer and brown sugar for an hour (no precise measurements, just "to taste").  Then sliced off the skin, scored the ham and pushed whole cloves unto the ham.  The cloves add flavor to the ham and at the same time serves as decoration.  Covered in foil, I stored the ham inside the fridge overnight.

Three hours before midnight of 31st December, I baked the ham (180-200 degrees) for an hour while brushing sauce from boiled ham unto the surface of the ham every 20 minutes.  On the last quarter of the hour, I placed two pineapple slices on top of the ham.

It was a good first try and the Husband approved!
Welcome 2011!


I cooked one of our favorite noodle dishes, Sotanghon Noodles with Scallops and Snow Peas If you want the recipe, you can find it
here.
Welcome 2011!

Welcome 2011!

At the stroke of midnight, we welcomed 2011 with hopeful, happy faces as we toasted "Cheers to a brighter 2011!" 

Wednesday, October 6, 2010

Recipes: Chicken Arroz Caldo and Tokwa't Baboy (Tofu and Pork)

Two of my favorite Filipino dishes: Chicken Arroz Caldo and Tokwa't Baboy.  I grew up eating these dishes cooked by my mom on rainy days when we'd all stay in at home.  Now that I live here in Sydney, I find comfort in these dishes during cold winter days.

Chicken Arroz Caldo

What you need for cooking:
Chicken breast cut into strips
1 cup of Glutinous Rice
2-3 cups of water
1 cup chicken broth
1 tbsp canola oil
1 whole onion, diced
6 cloves of garlic, minced
1 thumb-sized ginger, sliced
3-4 tbsp fish sauce
Pepper and salt (to taste)
Slices of Calamansi or Lemon


What you need for garnish:
6 cloves of garlic, diced and fried til golden brown
Chopped green onions
Boiled eggs, sliced
Chicharon (fried pork rinds), crushed


What you need to do:
1.  Saute onion, garlic and ginger in oil.
2.  Add chicken breast strips and stir til juice oozes from meat.
3.  Throw in the fish sauce, season as you stir.
4.  Add glutinous rice and wait til it turns brown in colour.
5.  While stirring, add chicken stock then water, one cup at a time.
6.  Bring to a boil, cover and let it simmer until grains start to crumble.
7.  Season with salt and pepper. 
8.  Keep stirring once in a while to make sure that the rice won't stick to the bottom

Once your Chicken Arroz Caldo is finished, serve it in a bowl and add garnishes mentioned above. Squeeze the calamansi or lemon on top of the Chicken Arroz Caldo for more flavour.

Note: You can use other parts of the chicken for this dish: chicken wings, thighs or drumsticks.  Some also add chicken liver.  I choose chicken breast strips so my Arroz Caldo will be less fatty and oily.
Chicken Arroz Caldo


Tokwa't Baboy (Tofu and Pork)

What you need:
1/4 kilo pork shoulder or pork belly, sliced into little cubes
1/4 kilo firm or extra firm tofu
1 onion, diced
4 tbsp soy sauce
5 tbsp vinegar
2 cups water
1 tsp brown sugar
Pepper and salt (to taste)
Canola oil

What you need to do:
1.  Boil pork in water.  When water runs dry, pour 2 tbsp of Canola oil and fry til golden 
     brown.  Set aside.
2.  Fry tofu til crunchy and golden brown.  Drain the fried tofu in paper towel.  Cut into
     cubes then place in a dish together with the pork
3.  In a saucepan, combine vinegar and soy sauce then bring to a boil.
4.  Add sugar and onions then stir.
5.  Season with salt and pepper to taste.
6.  Pour the sauce over fried tofu and pork.

Note:  You can also add green pepper or red chili unto the sauce to make it spicy.
Tokwa't Baboy

Bon appetit!

Chicken Arroz Caldo & Tokwa't Baboy

Saturday, August 28, 2010

Recipe: Crumbed Fish Fillets

An easy and healthy fish recipe...5 ingredients, 5 steps. 


What you need:

1/2 kilo fish fillets (your choice of Basa, Dory or Barramundi)
2 eggs
1 cup of Multigrain Bread Crumbs
1 cup of organic flour (plain flour will also do)
Oil for deep frying

Crumbed Fish Fillets

What you need to do:

1.  Cut fish fillets into small pieces (cutlets).
2.  Beat eggs
3.  Lightly coat fish cutlets in flour
4.  Dip in egg and coat evenly with multigrain bread crumbs
5.  Deep fry in oil for 6 minutes then drain on absorbent paper.
 

Serve with salad or chips (or both).  A good partner for vegetable dishes if you are having rice with it.  Dip in tartar sauce or sweet chili sauce to enhance flavour.

Tuesday, August 10, 2010

Recipe: Marinated Steak with Gravy

I usually just lather garlic salt on our steak before putting it inside the oven to grill and it's good to go.  One Sunday night, I decided to make my steak more flavourful.  So I marinated the meat with more than just garlic salt.


What you need for the marinade:

4 rib eye steaks (or any other meat you want like T-bone or Rump)
Garlic Salt
1/4 cup of dry Red Wine
Rosemary Leaves
6 cloves of Garlic, peeled and smashed
4 tbsps of Olive Oil
4 tbsps of water
Pepper

What you need to do:
1.  Place aluminum foil on top of baking pan
2.  Sprinkle garlic salt on the steaks and place each one on the baking pan.
3.  Smear crushed garlic on each side of the side.
4.  Pour red wine, olive oil and water on the rib eye steaks.
5.  Sprinkle a dash of Rosemary Leaves and Pepper.
6.  Leave for 15-30 minutes.
7.  When ready for grilling, place baking pan inside the oven.
8.  Oven-grill at 180 degrees for 20-30 minutes depending on how tender you want your steak is.

What you need for the gravy:
3 tbsp Gravox Traditional Powder
2 tbsp butter (or canola spread)
3 tbsp red wine
300 grams slice mushrooms

What you need to do:

  1. Boil 3 tablespoons of Gravox Traditional Powder in 250ml water.
  2. Mix in 2 tablespoons of butter/canola spread and 3 tablespoons of red wine.
  3. Throw in your sliced mushrooms.
  4. Stir until smooth and mushrooms are cooked.


Serve with salad on the side.

Bon appetit!  Happy weekend too!


Friday, June 4, 2010

Recipe: Pork Sisig

My Husband and I sometimes miss the night life in Manila.  We met at work but it was at a bar that we were officially introduced and later on became part of one barkada (group of friends).  One of the things we enjoyed then were our Friday night gimiks with our barkada (night out with friends).  Hanging out at a bar would almost always mean ordering Sisig to go along with a bottle of beer.

Sizzling Sisig is a Filipino dish made from parts of pig’s head and liver, seasoned with calamansi and chili.  If not eaten as an accompaniment to alcoholic drinks, this goes well with steaming rice.

Since my Husband and I miss having yummy Sisig every now and then, but haven’t found a place that serves it as delicious as the ones from the Philippines, I thought of making my own Sisig.


The easiest way to make Sisig is buying a pig’s head, chop the skin and ears into bits, then fry it with onion, garlic, chili, etc. (No more boiling, grilling or marinating).  In the suburb where we live, we have access to a shop where we can buy pig’s heads.  The catch is, your Sisig can be very oily (from too much fats) and not-so-healthy.  So scratch that.  Instead, I made a not-so-fatty Sisig at home.

Making my own sisig, as I discovered, was tedious.  It comes in four phases: boiling, grilling, marinating and frying.  

Here are the ingredients and what you need to do in every phase:

Boiling Phase
1/2 kilo Pork Neck
1/2 kilo Pork Shoulder/Rashers/Belly
1/4 kilo Minced Pork
1/4 kilo Liver (pork/chicken)
2 cups Water
1 cup Pineapple Juice
4 pcs Star Anise
1 tsp whole black peppers

Combine all ingredients mentioned above in a pot and bring to boil.  Simmer for about an hour or until tender.  Drain and leave until cool.


Grilling Phase:


Slice pork and liver in smaller pieces.  Place in baking pan and put inside the oven.  Grill for 30 minutes or until pork in golden brown and crispy.  Let it cool for awhile and then chop into small bits.

(The traditional way of doing this part of cooking sisig is placing pork in skewers and grilling over charcoal briquettes.  Since I'm doing it my way and to save myself time from putting pork into skewers and using another equipment, I grilled the pork via my oven instead.)

Marinating Phase:
Marinade Seasoning Mix

1 medium-sized onion, chopped
4 cloves of garlic, minced
4 chili (either red or green), chopped
1 tbsp ginger, sliced into small pieces
2 pcs Bay leaf
1/4 cup Vinegar
1/4 cup Calamansi juice (or lemon juice)
1/4 cup Pineapple juice
Salt and Pepper to taste
 
Mix chopped meat and Marinade Seasoning Mix in a bowl.  Keep marinated mixture in the fridge for 2-3 hours. 


Frying Phase:
1 tbsp Olive Oil
1 Egg (or you can add more, depends on how many you want)

In a frying pan, fry the marinated pork in a tablespoon of olive oil (or your choice of oil).  Stir every once in a while until pork is golden brown and crispy.  Make a hole in the centre and crack an egg. 

I have a special frying pan for my Sizzling Sisig and it's what I also use to serve this dish.  It's actually a square frying pan for steaks and it's thick, so it keeps the Sisig warm while we have dinner. 

(In restaurants, Sizzling Sisig is served using a hot plate.)

Voila!  My own version of Sisig!  Less fats from pork, less oil, more meat. 

The first time I cooked this, I made sure we had beer at home.  We had this for dinner and my Husband loved it!!! 
It may be tedious but seeing my Husband's face lit up the moment I served this was very much worth all the effort.  He even asked me to cook it again the week after.

Bon Appetit!


Share/Bookmark


Friday, May 21, 2010

Recipe: Adobong Puti

Two nights ago, I shared in twitter and plurk that I was cooking Adobong Puti (White Adobo) for dinner. My update was followed by interest on how it looked and how it is cooked. And so I promised to share the recipe.

I never realized that there are some who haven't tried Adobong Puti. I thought it had the equal popularity as the normal Adobo.

Adobong Puti is simply Adobo without the soy sauce. However, I don't cook my Adobo the same way I cook my Adobong Puti.

Like Adobo, the Adobong Puti is a staple at my parent's home. Both my parents are good cooks. My mom's Adobo is to-die-for (when I worked in the Phils, my workmates ask me to exchange ulam with them whenever I had Adobo for baon), while my Dad cooks a mean Adobong Puti.

Although I never try to rival my parents cooking, I have tried to replicate their Adobo dishes to remind me of home and sometimes, just because I miss them. Not to mention that is one of the easiest Filipino dish there is.

Two nights ago, I think I succeeded in cooking Adobong Puti, one I think my parents can be proud of.

What you need:

Half a kilo of Pork (I combine two kinds of Pork: pork neck and pork shoulder), cut into cubes
5 cloves of Garlic
1/2 cup Vinegar
2 tbsp Canola Oil
2 cups Water
2-3 Bay Leaves
Salt and Pepper, to taste


What you need to do:

1. Put all ingredients (except Canola oil) in a wok. Cover and let it simmer over medium heat.
2. Occasionally mix and take out pork residue on top.
3. Cook until water is gone and only the oil from pork is visible.
4. Add Canola oil and turn up the heat to crisp the meat.
5. Cook until crisp and golden brown.
6. Serve hot with rice.

Kain na! {Filipino way of saying Bon Appetit!}

Tuesday, May 4, 2010

Recipe: Oven-baked Parmesan Chicken

If you want a change from your usual chicken recipes and lessen your time in prepping and cooking, I suggest you try this recipe.

This dish is healthy and very easy to cook. All you need are a few ingredients, an oven and 35 minutes of your time. If you don't have an oven, a mini-oven or toaster oven will do.


What you need:

4 Chicken Breast Fillets
2 cups Multigrain Bread Crumbs
3 tbsp Parmesan Cheese, finely grated
2 Spring Onions, finely chopped
1/2 cup Lemon Juice
4 tbsp Unsalted Butter, melted
1 tbsp Parsley, chopped
Salt and Pepper to taste
2 tbsp Olive Oil

What you need to do:

1. In a small bowl, mix in your multigrain breadcrumbs, parmesan cheese, spring onions, melted butter, salt and pepper.

2. Using your hands or a fork, press the mixture on top of the chicken breasts, to form an even coat.

3. Transfer the chicken breasts to a greased shallow oven tray. Before putting inside the oven, pour the olive oil and lemon juice on top of the coated chicken breasts. Bake for 20 minutes at 180 degrees Celsius.

4. Remove chicken from the oven and keep warm. Add the parsley on top and serve.


Tips:

1. The type of breadcrumbs is up to you. I use multigrain breadcrumbs at home to up the fibre nutrient of this dish.

2. Go easy on the salt. The breadcrumbs and Parmesan Cheese has a certain saltiness already so taste your mixture before pouring in the salt.

3. Pour a bit of water on your oven tray before placing it inside the oven to avoid dryness of the chicken. Other than a tasty, delicious flavour, we want the chicken juicy as well.
Bon appetit!


Thank you's


I would like to thank everyone who email, tweet or message me their feedback(s) on the recipes I share and for letting me know that they have tried my recipe(s). Your comments and appreciation bring joy and inspiration to me. Maraming salamat!